How to use CMake/CPack to create beautiful GUI-installers
In this article, we look at the CMake utility tool CPack, which helps us package our libraries and executables generated by CMake into a nice and easy-to-use graphical user interface to guide users through the installation process. Windows users will be familiar with these graphical user interfaces for installation, where we can select an installation directory and what software components will be installed. This article will look at how we can achieve this with CMake and CPack.
By the end of this article, you will know all there is about packaging software with CMake and how we can create cross-platform installers that provide an easy and uniform installation process across Windows, Linux, and macOS. This introduces the last feature we will cover about CMake, and if you have followed along the rest of this series, you will have become a CMake pro and are ready to use it for your own projects, never having to worry about compilation, documentation, installation or packaging again; now we are ready to automate everything with CMake!
All developed code and resources in this article are available for download. If you are encountering issues running any of the scripts, please refer to the instructions for running scripts downloaded from this website.
- Download: Build-Systems-Part-8
In this series
[custom_category_posts_list category_slug="automating-cfd-solver-and-library-compilation-using-cmake"]In this article
Introduction: What exactly is an installation?
We have been throwing around the concept of installation in various previous articles, but we have never really discussed what installation means. Most of us, especially those from a Windows background, think of installation as this little graphical window that walks you through the process. You have to select an install location, accept the license before proceeding, and then the installer will do its thing. But what happens under the hood?
Well, in a previous article on installing our own complex number library, we first had to configure our project and then compile it. This generated all of our targets in the build/ directory, along with some other files required by CMake. The last step included an install directive, which had the form of
cmake --install . --prefix "C:\temp" --config ReleaseHere, we specified the installation location with the --prefix command line argument. CMake then used all of the information we provided within calls to the install() function to figure out which files should be copied into the --prefix location, and we already saw a few times that this included the header files within the include/ folder, as well as the library itself in the lib/ folder (with potential documentation within docs/). Since we also want other projects to use our library, we also generated a couple of *.cmake files within the lib/cmake/<lib-name>/ folder.
Thus, we can say that installing is the mere act of copying files to a destination directory that creates a certain, well-defined folder structure. And that is installation, pretty much. Next time you install something larger, have a look at what the output is saying, and you'll see statements like now copying <filename> or something similar.
This is also why we have installers for different platforms. Whenever you download an installer from somewhere, it will ask you for your platform and usually also hardware architecture (e.g. 32-bit vs 64-bit). Based on the information you are sending through the browser to the website, it can usually auto-detect your operating system and automatically offer you the right package. See the download for VScode, for example, shown below:
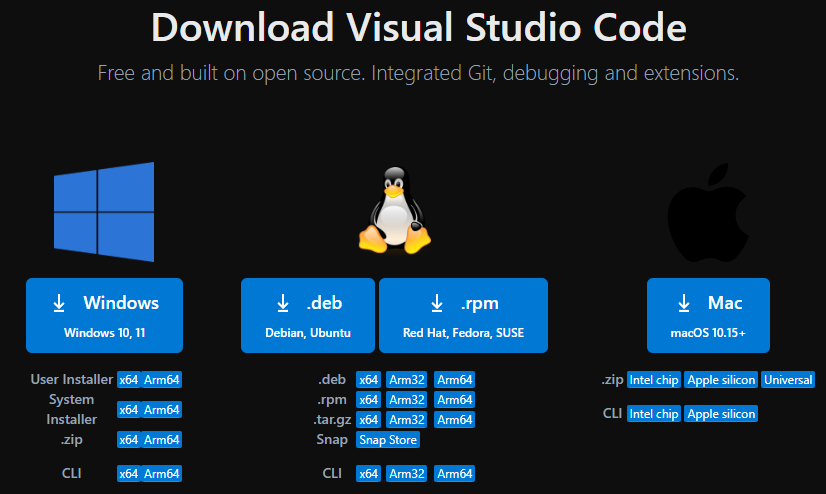
You get 64-bit installers on Windows and different types of installers, just as you do in Linux and macOS. For Linux, you also have 32-bit variants as this operating system is usually used to run on low-budget hardware (e.g. Raspberry PIs and the like). VScode also future-proofs their installers by providing support for ARM architecture, which consumes less power than an Intel or AMD CPU but is generally weaker as a result (and thus used in mobile devices, predominantly). Apple has moved to ARM CPUs, and others will likely follow.
For the developer, this means that each platform they want to support, they have to compile their code on that platform, for that specific CPU, both for 32-bit and 64-bit if desired. That is a lot of different hardware you'll have to have, though online solution exists that can help you do that (instead of owning all these different platforms yourself).
There are additional things the installer can do for us, typically modifying the environmental variables to register a specific path (within your installation directory) with the system so it knows where to find your executables or libraries. But at its core, an installer will simply copy files to a specific directory. In this sense, you can think of them as glorified zip archives that extract themselves into a desired location on your machine.
So then, we do have a better understanding of the install step now, and to make things more interesting, the screenshot below shows what we want to achieve in today's article:
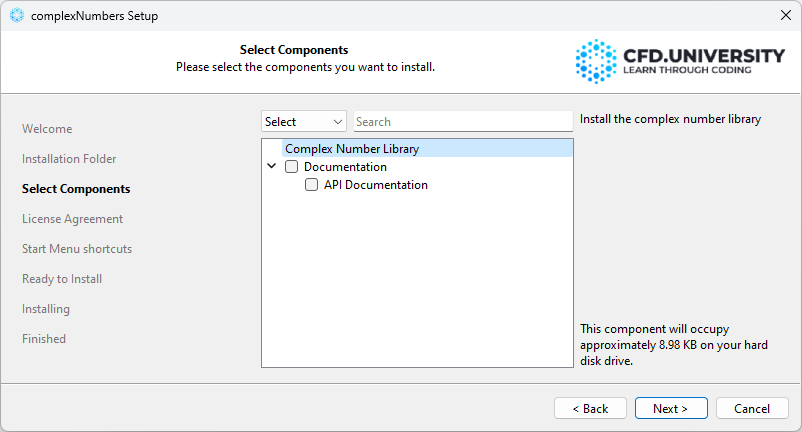
We will give additional instructions to CMake to provide us with a graphical user interface to install our complex number library. It will allow us to specify the install location, and we can select which parts of the library we want to install (i.e. the library itself and the documentation). We have to accept a license agreement (which is as liberal as it can be!), add a start menu shortcut (though, since we install a library and not an executable, this won't have an effect), and finally, install (copy) our library to our selected installation destination.
Best of all, what we do works cross-platform, so our friends on Linux and macOS get the same graphical installer instead of having to hack commands into the command line. I hope this will motivate you enough to read on, so let's get started!
Providing a GUI-based installer to our complex number library using CMake and CPack
In this section, we will continue to use the project that we developed in the previous article. If you have not read up on that, I would suggest to do so now, at least browse through the various CMake files to get get a feeling for the project structure. We have prepared the complex number library, which we have worked with throughout this series, in a form that makes it very easy for us to focus only on the packaging step, which will generate the graphical installer as the end product.
First things first, what is CPack?
So far, we have been working with CMake and already learned that there are some useful helper tools that we can use with CMake. Most notably, we learned about CTest and how we can use it to automate our testing. As a quick refresher, CTest allows us to register unit, integration, and system tests with CMake, which will then compile all required tests into executables and make them available to CTest. We can then execute all tests at the same time. It will also provide us with some functionality to examine our test results at the end.
But that's not all, and CMake recognises that the compiling, testing, and installing steps that we have looked at thus far are not all that we need when automating our build. In particular, once we have generated all of our targets and we have everything compiled within our build/ folder, we already know how install this into a target directory, so why not provide a graphical installer as well, as is the case so commonly on Windows, at least?
Well, it turns out that going from having a working install step in your CMake files to a graphical user interface for the installation does not require that much more effort, and we already have most of the things ready to do this. CMake provides us with an additional tool called CPack, which will take our project once compiled and provide a nice interface to install it locally on our machine. In its most primitive form, we can ask it to simply generate a zip archive, which we can extract wherever we want (see VScode above; they do provide zip versions as well).
Similar to how we can use different generators to build our CMake-based project (e.g. Ninja, Make, MSBuild, XCode, etc.), we can use different generators that will generate the graphical user interface installer. Based on which generator we use, we have different features available, and the look of each of these generators is, of course, different as well.
If you try to find a list of available generators in the CPack documentation, good luck. They are not listed, so resorting to other websites is the only option to get an idea of which generators are available. As you can see, there are quite a lot. There is some good news here, though: there is a single CPack generator that allows the creation of installers for Windows, Linux, and macOS from a single script. So, this must be our choice in a quest to support cross-platform development.
The generator in question is the Qt Installer Framework, or IFW in short, which comes with the default distribution of Qt. Qt by itself is a beast and is used to generate graphical user interfaces (GUI). Any modern CFD software you use will use Qt under its hood to create the GUI, e.g. Fluent, Pointwise, Tecplot, and Paraview are all examples that use Qt for the GUI part. It is also heavily used for embedded systems, like displays in cars (navigation, digital speedometers, etc.), and even mobile phones have been conquered by Qt.
Before we proceed, we first need to install the IFW tools before we can continue with CMake, which we will do next.
Getting the Qt Installer Framework (IFW)
Ah, so trying to give instructions on how to download Qt is a bit like teaching a blind person to drive. It is doable but high-risk! Their website seems to change every time I visit it, so the safest option is likely to simply search for Qt download and follow the links. At your own risk, you may also try to use the following link: Download Qt. Alternatively, you may try this direct download link for just the Qt Installer Framework (the rest of the description below assumes you are downloading the full Qt version).
There is one thing which you'll need to know before continuing with Qt, it is licensed under a dual license, which means it is free of charge to open-source projects (though have a somewhat restrictive GPL/LGPL license in place) and paid for commercial projects. So in case the above link is broken, always search for the open source version, or community edition, or whatever other term they come up with in the future to keep me awake at night. However, if you just want to use the Qt Installer Framework, you don't have to worry about licensing, I suppose.
Once downloaded, you'll also need to create an account to install the software. Annoying, but that's the price we have to pay for cross-platform development. Pssst, you can always use temp-mail. I won't snitch on you!
Ok, so you have created an account, you have downloaded the Qt installer, now it is time to get Qt installed, well, its Installation Framework, anyways. You should see an installation screen like the one below:
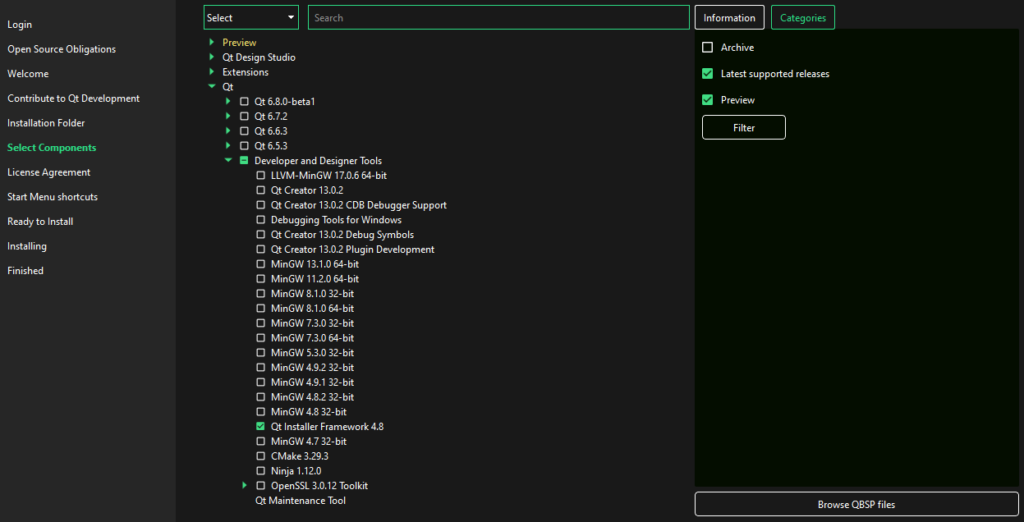
Once you do get to the step of selecting components, all we want to install is the Qt Installer Framework (latest version, here 4.8 for me). You can ignore any of the other components, in particular, Qt itself, as you won't be needing it. We can also install CMake and Ninja here, how nice of them (but likely you already have them on your system).
The GUI that you are seeing above is also generated with the Qt Installer Framework. It does allow for heavy customisation through CSS, though we will be using the default look of the installer here, which will be familiar to most users on their platform.
Follow the installation to the end, and make sure you have the binarycreator.exe on your system now (for me, this is in C:\Qt\Tools\QtInstallerFramework\4.8\bin, which is using the default installation location). If it is on UNIX, you'll simply see binarycreator without an executable suffix. This executable will be used by CPack to generate the GUI installer based on inputs it will generate for you based on instructions we specify in our CMake files.
Once verified that this executable is indeed there, we are now ready to modify our project to provide a graphical installer for our users. Let's crack on with that!
Project structure
As alluded to above, we will be working with the same project structure as in the previous article as a starting point. The only changes we are making are to the cmake/ folder, where we are adding an additional packaging.cmake script, which in turn will require a few resources, which are located in the cmake/resources/ folder. These are mainly a logo to be used during the installation, and a license file. The various file formats for the logo, as we will see later, are used for different platforms, and it will be used as the icon of the executable.
root
├── build/
├── cmake/
│   ├── resources/
│   │   ├── license.txt
│   │   ├── logo.icns
│   │   ├── logo.ico
│   │   └── logo.png
│   ├── complexNumbersConfig.cmake.in
│   ├── docs.cmake
│   ├── install.cmake
│   ├── makeLibrary.cmake
│   ├── options.cmake
│   └── packaging.cmake
├── complexNumberLib/
│   ├── CMakeLists.txt
│   ├── complexNumbers.cpp
│   └── complexNumbers.hpp
├── docs/
│   ├── doxygen-awesome-css-2.3.2/
│   │   └── ...
│   ├── userGuide/
│   │   ├── index.md
│   │   ├── installation.md
│   │   ├── introduction.md
│   │   └── usage.md
│   └── Doxyfile.in
├── CMakeLists.txt
└── conanfile.txt
CMake build scripts
Instead of going through the various CMake files again, we'll only check out the new files that have changed or were added to keep the complexity of this section to a minimum. If you need a refresher on what the other scripts in the cmake/ folder are doing. I'll leave a link to the section of the previous article where you can read up on them.
Top-level CMakeLists.txt file
The top-level CMakeLists.txt file has changed slightly, but only by adding an additional include() statement (seen on line 25 below), to include the packaging of our project into a graphical installer. The rest of this file and the included files in the cmake/ directory, remain unchanged.
cmake_minimum_required(VERSION 3.23)

project(complexNumbers
  LANGUAGES CXX
  VERSION 1.0.0
  DESCRIPTION "A simple C++ library for complex numbers"
)

# include custom options
include(cmake/options.cmake)

# create complex number library target
include(cmake/makeLibrary.cmake)

# go through the complexNumberLib/ subdirectory and add any files to the library as needed
add_subdirectory(complexNumberLib)

# create the documentation if requested
include(cmake/docs.cmake)

# install the library and its headers
include(cmake/install.cmake)

# package the project with a cross-platform GUI installer
include(cmake/packaging.cmake)
CMake helper file to package the installer with IFW and CPack
So, let's get to the packaging file, which is a bit longer but not necessarily complex. I'd suggest you read through it first, and then we'll break it up into portions (as it is almost 100 lines), and then we can go through it together below the code.
# set some project metadata for the installer
set(CPACK_PACKAGE_NAME ${CMAKE_PROJECT_NAME})
set(CPACK_PACKAGE_VENDOR "cfd.university")
set(CPACK_PACKAGE_CONTACT "tom@cfd.university")
set(CPACK_PACKAGE_DESCRIPTION_SUMMARY "A C++ library for Complex Numbers")
set(CPACK_PACKAGE_INSTALL_DIRECTORY ${CPACK_PACKAGE_NAME})
set(CPACK_PACKAGE_VERSION_MAJOR ${CMAKE_PROJECT_VERSION_MAJOR})
set(CPACK_PACKAGE_VERSION_MINOR ${CMAKE_PROJECT_VERSION_MINOR})
set(CPACK_PACKAGE_VERSION_PATCH ${CMAKE_PROJECT_VERSION_PATCH})
set(CPACK_VERBATIM_VARIABLES YES)

# if we not call the line below, groups won't show properlly in the GUI installer
set(CPACK_COMPONENTS_GROUPING IGNORE)

# ignore directories and files
set(CPACK_SOURCE_IGNORE_FILES
  "/.git/"
  "/.vscode/"
  "/build/"
  "/CMakeCache.txt"
  "/CMakeFiles/"
  "/cmake_install.cmake"
  "/CPackConfig.cmake"
)

# we are interested in cross-platform support. IFW is the only generator that allows for it, so set it explicitly
set(CPACK_GENERATOR "IFW")
set(CPACK_IFW_ROOT "C:/Qt/Tools/QtInstallerFramework/4.8")

# set some IFW specific variables, which can be derived from the more generic variables given above
set(CPACK_IFW_VERBOSE ON)
set(CPACK_IFW_PACKAGE_TITLE ${CPACK_PACKAGE_NAME})
set(CPACK_IFW_PACKAGE_PUBLISHER ${CPACK_PACKAGE_VENDOR})
set(CPACK_IFW_PRODUCT_URL "https://cfd.university")

# create a more memorable name for the maintenance tool (used for uninstalling the package)
set(CPACK_IFW_PACKAGE_MAINTENANCE_TOOL_NAME ${PROJECT_NAME}_MaintenanceTool)
set(CPACK_IFW_PACKAGE_MAINTENANCE_TOOL_INI_FILE ${CPACK_IFW_PACKAGE_MAINTENANCE_TOOL_NAME}.ini)

# customise the theme if required
set(CPACK_IFW_PACKAGE_WIZARD_STYLE "Modern")

# adjust the default size
set(CPACK_IFW_PACKAGE_WIZARD_DEFAULT_HEIGHT 400)

# set the installer icon and logo
if(WIN32)
  set(CPACK_IFW_PACKAGE_ICON ${CMAKE_CURRENT_LIST_DIR}/resources/logo.ico)
  elseif(APPLE)
  set(CPACK_IFW_PACKAGE_ICON ${CMAKE_CURRENT_LIST_DIR}/resources/logo.icns)
endif()
set(CPACK_IFW_PACKAGE_WINDOWS_LOGO ${CMAKE_CURRENT_LIST_DIR}/resources/logo.png)
set(CPACK_IFW_PACKAGE_LOGO ${CMAKE_CURRENT_LIST_DIR}/resources/logo.png)

# now include the relevant (cross-platform) packaging script
include(CPack)
include(CPackIFW)

# add the library as a component to the installer
cpack_add_component(complexLib
  REQUIRED
  DISPLAY_NAME "Complex Number Library"
  DESCRIPTION "Install the complex number library"
)

cpack_ifw_configure_component(complexLib
  REQUIRED
  LICENSES "MIT License" ${CMAKE_SOURCE_DIR}/cmake/resources/license.txt
  SORTING_PRIORITY 99
)

# add the documentation under a "developer" group component
if (BUILD_DOCS)
  cpack_add_component(documentation
    DISPLAY_NAME "API Documentation"
    DESCRIPTION "Documentation for the complex numbers library"
    GROUP documentationGroup
  )

  cpack_ifw_configure_component(documentation
    DEFAULT FALSE
    GROUP documentationGroup
    SORTING_PRIORITY 1
  )

  cpack_add_component_group(documentationGroup
    EXPANDED
    DISPLAY_NAME "Documentation"
    DESCRIPTION "Install the complex Number Library documentation"
  )

  cpack_ifw_configure_component_group(documentationGroup
    SORTING_PRIORITY 1
  )
endif(BUILD_DOCS)
Setting generic variables for CPack
The first 24 lines of the cmake/packaging.cmake file is concerned with setting some generic variables that may (or may not) be used by CPack. We have to understand that CPack is a general tool for creating an installer, but it does support different graphical installation tools, which are separate from CPack. It is similar to how CMake supports different generators, like Make, Ninja, MSBuild, and so on. Each of these generators has different rules and variables, and the same is true for the installation generators.
Thus, we set some generic variables for CPack as seen below, and then depending on the installer, these may then be used (or ignored). Even if some of them are ignored (and I have tested, not all of that information will be used later), they serve as good documentation for developers who have to go through this file. Setting these now will help them extend this file, should they need to.
# set some project metadata for the installer
set(CPACK_PACKAGE_NAME ${CMAKE_PROJECT_NAME})
set(CPACK_PACKAGE_VENDOR "cfd.university")
set(CPACK_PACKAGE_CONTACT "tom@cfd.university")
set(CPACK_PACKAGE_DESCRIPTION_SUMMARY "A C++ library for Complex Numbers")
set(CPACK_PACKAGE_INSTALL_DIRECTORY ${CPACK_PACKAGE_NAME})
set(CPACK_PACKAGE_VERSION_MAJOR ${CMAKE_PROJECT_VERSION_MAJOR})
set(CPACK_PACKAGE_VERSION_MINOR ${CMAKE_PROJECT_VERSION_MINOR})
set(CPACK_PACKAGE_VERSION_PATCH ${CMAKE_PROJECT_VERSION_PATCH})
set(CPACK_VERBATIM_VARIABLES YES)

# if we not call the line below, groups won't show properlly in the GUI installer
set(CPACK_COMPONENTS_GROUPING IGNORE)

# ignore directories and files
set(CPACK_SOURCE_IGNORE_FILES
  "/.git/"
  "/.vscode/"
  "/build/"
  "/CMakeCache.txt"
  "/CMakeFiles/"
  "/cmake_install.cmake"
  "/CPackConfig.cmake"
)
Let's dial in on some details. On line 6, we set the CPACK_PACKAGE_INSTALL_DIRECTORY. This name will be used by the graphical installer to determine the folder name under which this library will be installed. On Windows, the default installation directory is C:\Program Files\<package-name>. In this case, it is set to CPACK_PACKAGE_NAME, which in turn is set on line 2 to CMAKE_PROJECT_NAME, which is the name defined in the call to project() in the top-level CMakeLists.txt file. Thus, our default installation directory is C:\Program Files\complexNumberLib (on Windows).
Lines 7-9 provide the project version, again reusing information set in the call to project(), and line 10 is one of those odd variables we just have to set without questioning. If we lookup CPACK_VERBATIM_VARIABLES in the CMake documentation, then this is what we are seeing:
" [...] characters like quotes and backslashes can cause parsing errors or alter the value received by the cpack program. Defaults to FALSE for backwards compatibility."
Great, so because of backward compatibility (which is one of the things CMake prides itself in, i.e. it wants to support CMake files which are decades old), we have to explicitly tell CMake to turn off its broken functionality, otherwise we'll get into trouble. I don't think any serious projects still use pre-version 3 CMake, but here we are. But hey, all of these broken features we have to identify ourselves (which the documentation does not warn us about) make using CMake akin to playing Russian roulette; it species things up a bit!
Which brings me to line 13. It is one of those lines where CMake really starts to annoy me because, firstly, the default behaviour doesn't make any sense (to me at least); secondly, if you do look up this variable in the documentation, it doesn't tell you how it messes up the graphical installer, and thirdly, the only way to find out about it is to go through other people's CMake files and catch this by accident. Looking at their comments when setting this variable, I can sense the same level of frustration with CMake, so it is not just me!
Lines 16-24 just tell the installer if there are any files or directories we want to exclude from the installer. The entries provided here serve as a good default starting point, and then you will see, during testing, if you need to add (or remove) any files and folders here.
Set IFW-specific packaging information
Once we have set our generic variables for CPack, we can start to add some specific variables for the Qt Installer Framework (IFW), which we want to use exclusively in this project. These are shown below.
# we are interested in cross-platform support. IFW is the only generator that allows for it, so set it explicitly
set(CPACK_GENERATOR "IFW")
set(CPACK_IFW_ROOT "C:/Qt/Tools/QtInstallerFramework/4.8")

# set some IFW specific variables, which can be derived from the more generic variables given above
set(CPACK_IFW_VERBOSE ON)
set(CPACK_IFW_PACKAGE_TITLE ${CPACK_PACKAGE_NAME})
set(CPACK_IFW_PACKAGE_PUBLISHER ${CPACK_PACKAGE_VENDOR})
set(CPACK_IFW_PRODUCT_URL "https://cfd.university")

# create a more memorable name for the maintenance tool (used for uninstalling the package)
set(CPACK_IFW_PACKAGE_MAINTENANCE_TOOL_NAME ${PROJECT_NAME}_MaintenanceTool)
set(CPACK_IFW_PACKAGE_MAINTENANCE_TOOL_INI_FILE ${CPACK_IFW_PACKAGE_MAINTENANCE_TOOL_NAME}.ini)

# customise the theme if required
set(CPACK_IFW_PACKAGE_WIZARD_STYLE "Modern")

# adjust the default size
set(CPACK_IFW_PACKAGE_WIZARD_DEFAULT_HEIGHT 400)

# set the installer icon and logo
if(WIN32)
  set(CPACK_IFW_PACKAGE_ICON ${CMAKE_CURRENT_LIST_DIR}/resources/logo.ico)
  elseif(APPLE)
  set(CPACK_IFW_PACKAGE_ICON ${CMAKE_CURRENT_LIST_DIR}/resources/logo.icns)
endif()
set(CPACK_IFW_PACKAGE_WINDOWS_LOGO ${CMAKE_CURRENT_LIST_DIR}/resources/logo.png)
set(CPACK_IFW_PACKAGE_LOGO ${CMAKE_CURRENT_LIST_DIR}/resources/logo.png)

# now include the relevant (cross-platform) packaging script
include(CPack)
include(CPackIFW)
First, we tell CPack that we want to use IFW (line 2) and then where to find it (line 3). If you want to support several installers, then you should not hardcode the generator here. Instead, later, when you call CPack on the command line, you can specify it with the -G IFW command line argument, i.e. cpack -G IFW. But since we are only interested in using CMake's only cross-platform installer, we can safely hardcode it here and cpack will use IFW correctly, without us having to specify it on the command line.
The variables set on lines 6-9 make use of some of the generic CPack variables, whereas line 6 just adds additional output information to the console. This can be helpful if things go wrong and we need to debug our packaging.cmake file.
Lines 12-13 set the name of the maintenance tool. We typically want to include some form of the project name here, so that we can later distinguish it from other packages. The Maintenance tool allows user after they have installed our library to either modify the installation, or to uninstall our package.
Line 16 influences the look of the graphical user interface, and while there are several available, Modern seems to be a sensible default look. I have also slightly increased the height of the installer window. The default one seems too small and requires scrolling within the window, so I have adjusted the height here to 400 pixels.
Lines 22-26 set the logo of our installer (the icon of the executable). They are different for Windows and macOS (hence all of these different logo files within our cmake/resources/ folder), and as far as I am aware, we can't set it on Linux, so no logo is included here. Lines 17-18 provide some additional customisation of the installer itself, where we can include a project logo. This will be shown at the top-right part of the installer window throughout the installation process.
Finally, after setting all variables (both for CPack and IFW), we are ready to include both to make them available for our project, and this is done on lines 31 and 32. It is recommended to first set the variables and then include CPack (and an
Creating the complex number library installation rule
We have set up the basics of the installer thus far, but we don't know yet what we should actually install. This is what we want to focus on next. Let's have a look again at our installer that we saw above. This is what we saw:
Once we reach the Select Components screen, we are able to tell the installer what we want to install, leaving out any components we do not care for. In our case, we see that the complex number library will always be installed (it does not have a checkbox), and this makes sense, we want to always install the library and its header files, otherwise why are we bothering with the installer in the first place?
Then, we also have a Documentation group under which we have the API Documentation. We only have one item here (mainly just to show that we can have sub-components in groups), and selecting the Documentation group would select all components beneath it (in this case, again, there is only the API Documentation). Also note that the documentation is not selected by default, and these are all behaviours that we can influence.
So, with this new understanding, let's see how we can add components to our installer. This is a 2-step process. First, we tell CPack about a component and then IFW. IFW will receive basic information from the CPack component, and then we can set some specific settings for the IFW component, which the CPack component does not support. This is shown below for the complex number library.
# add the library as a component to the installer
cpack_add_component(complexLib
  REQUIRED
  DISPLAY_NAME "Complex Number Library"
  DESCRIPTION "Install the complex number library"
)

cpack_ifw_configure_component(complexLib
  REQUIRED
  LICENSES "MIT License" ${CMAKE_SOURCE_DIR}/cmake/resources/license.txt
  SORTING_PRIORITY 99
)
On lines 2-6, we call cpack_add_component(), and the first argument is the name of the component that we want to add. Where is this coming from? Well, for this, we have to briefly look into our cmake/install.cmake file again. We defined our install target for the complex number library as
install(TARGETS ${CMAKE_PROJECT_NAME}
  EXPORT complexNumbersTargets
  FILE_SET HEADERS
  COMPONENT complexLib
)
Notice how we specified a COMPONENT on line 4, which is called complexLib. This is the same name as the first argument in the cpack_add_component() call. Then, we say that the component is REQUIRED, and we saw in the graphical installer above that we can't select a checkbox here (because of this REQUIRED setting).
The DISPLAY_NAME is the name seen in the graphical installer and the DESCRIPTION is shown to its right when selected (also seen in the screenshot above).
We then call spac_ifw_configure_component(), where again, the first argument must be the same name as the COMPONENT keyword specified during the call to install(). We set it to REQUIRED as well, and provide a license file that users have to accept when clicking through the installer. In this case, it is located in the cmake/resources/license.txt file, and we use the very permissive MIT license here (it doesn't get much more open-source than this!).
The SORTING_PRIORITY tells IFW where to place this item in the component tree. Since I want this package to be on top all the time, I just give it a very high priority. The higher this value, the further to the top it will go.
Creating the documentation installation rule
Next, we want to also include the documentation, and this is slightly different, as I also want to show how to work with component groups, so that we can, potentially, group different components under the same tree entry. This is shown below.
# add the documentation under a "developer" group component
if (BUILD_DOCS)
  cpack_add_component(documentation
    DISPLAY_NAME "API Documentation"
    DESCRIPTION "Documentation for the complex numbers library"
    GROUP documentationGroup
  )

  cpack_ifw_configure_component(documentation
    DEFAULT FALSE
    GROUP documentationGroup
    SORTING_PRIORITY 1
  )

  cpack_add_component_group(documentationGroup
    EXPANDED
    DISPLAY_NAME "Documentation"
    DESCRIPTION "Install the complex Number Library documentation"
  )

  cpack_ifw_configure_component_group(documentationGroup
    SORTING_PRIORITY 1
  )
endif(BUILD_DOCS)
First, we define our components again, and this is very similar to what we saw before for the complex number library component. The only difference here is that we specify a GROUP parameter, both for the call to cpack_add_component() on lines 3-7, and cpack_ifw_configure_component() on lines 9-13. We can also see that we set the DEFAULT value to false on line 10, which means that this component (the documentation) is deselected in the installer by default. The user has to activate it manually, if it should be installed.
Looking quickly at the documentation's install() call, we see the following in the cmake/install.cmake file:
install(
  DIRECTORY ${CMAKE_BINARY_DIR}/docs/html
  DESTINATION docs/complexNumberLib/
  COMPONENT documentation
)
Again, we have specified here a COMPONENT with the name of documentation, and this is the same name we provide as the first argument to the calls to cpack_add_component() and cpack_ifw_configure_component() we saw above.
Then, we have a call to cpack_add_component_group() on lines 15-19. Notice that this is after the call to the component, which is part of this component group. Here, we give a component group name as the first argument (which does not have to mirror any names in the install() calls). The component group name must be different to all the other components, and it can't be the same. Adding the suffix Group is usually a safe option.
Apart from the DISPLAY_NAME and DESCRIPTION which we saw above, we can also add the EXPANDED keyword, which will show the sub-component tree expanded by default (otherwise, the user has to first expand it to see all components underneath it).
Next, we call cpack_ifw_configure_component_group(), where we provide now the name of the component group set on line 15, i.e. the first argument given to cpack_add_component_group(). Notice that we now have two SORTING_PRIORITY properties. The one set on line 22 for the component group will tell IFW where to place the group in the component tree. It is set to 1, so it has a low priority, and so it will show after the complex number library.
We can also sort items within this sub-component tree, and this is what we do with the property set on line 12, i.e. when we create the API Documentation component. In this case, we only have one item in the Documentation group, but if we had more, then we could sort the components in this tree as well with the SORTING_PRIORITY property.
And that's it! We have now defined all CPack generic, and IFW specific properties, along with components and potential component groups. We are now ready to create our installer, so let's look at the command line instructions we need to do exactly that.
Command line instructions
The command line instructions are, again, pretty much the same as what we saw in the last article, but we'll go through them here for completeness. As I am using Conan to get Doxygen into my project, I'm installing it with the following call (from within the root level directory of the project):
conan install . -pr dev --output-folder=build --build=missinSince I am on Windows and I want to get files created for PowerShell and not the outdated command prompt, I have added instructions to my dev profile and use that for the installation. You can see comments on this dev profile in the last article. If you have Doxygen already installed systemwide, i.e. through your package manager, then you can ignore this (and the next) step.
Once Conan has successfully installed Doxygen, change to the build/ folder and execute the necessary scripts. On Windows, we source the location for Doxygen through a call to
.\conanbuild.ps1On UNIX, you would call:
./conanbuild.shThis should make everything we need visible to CMake, and we can proceed. Building the project requires the same steps as before: we build a debug version (though you could change this to release as well, which you would typically do if you want to package your project for release), we require the documentation to be built, and we use Ninja for the build itself:
cmake -DCMAKE_BUILD_TYPE=Debug -DBUILD_DOCS=ON -G Ninja ..After the project is configured. we proceed to build the library and its documentation with:
cmake --build . --config DebugAt this stage, we would typically call cmake --install . --config Debug, but not so now. We want to take an intermediate step by packaging everything into a graphical installer, and then the user can execute the install step by going through the installer. It should be mentioned here, though, that installing the library with the call above is pretty much the same as using the graphical installer, i.e. our compiled library and documentation just get copied to a specific place on our hard disk.
However, most people are probably happy not having to install a fully-fledged development environment with compilers and CMake just to get the installation working, and so the graphical installer may be more appealing to end users (even if they are developers). Since we already specified that we want to use IFW as our generator for the installer, we can simply call CPack at this point:
cpackGo into your build/ folder, where you should now see an executable of the name <packageName-verion-platform.suffix>. In this case, it will translate to complexNumbers-1.0.0-win64.exe. Notice how the installer has its own logo, which we specified during the configuration of IFW. This is how it looks on my end:
Pretty sweet! If you click on it, you will be guided through the installation process and this will feel like installing most other software on your system, if you are used to graphical installers!
Summary
So then, we explored the last feature of CMake that I wanted to discuss in this series, and that is packaging your project after a new release has been generated. In this article, we used the Qt Installer Framework (IFW), which requires some input files that CMake can generate. Based on these input files, we are able to generate a graphical user interface that will guide the user through the installation that most Windows (and potentially Mac) users are used to. It doesn't get much simpler than this to make your project available to others!
Installers are typically used for executables and probably less commonly for libraries, as these tend to be compiled and installed by the developers themselves, who likely know their way around CMake anyway (or how to use Conan or a similar package manager). However, what we saw in this article can be applied to executables as well, and with this knowledge in hand, you are now ready to package, release, and ship your software like a pro!

Tom-Robin Teschner is a senior lecturer in computational fluid dynamics and course director for the MSc in computational fluid dynamics and the MSc in aerospace computational engineering at Cranfield University.